How to Create a Raspbian SD Card for your Raspberry Pi on Windows
by Alan Pfahler on February 18, 2020This resource explains how to install a Raspberry Pi operating system image on an SD card. You will need an SD card reader to install the image.
The SD card and SD card reader we recommend
In general, the choice of a good SD card can totally change your experience of the Raspberry Pi. Indeed, the SD card is always called by the system. Therefore, if the card is slow the system is also slow. We advise you to choose one of the memory cards below. These are very high performance cards, with quite acceptable costs.
- For a small standard installation, choose a 32GB card.
- For an installation, more multimedia or log server, choose a 64GB card.
- For the ultimate installation with a variety of multimedia movies and movies, go for a 128GB card.
- High speed USB 3.0 multiple slots microSD card reader, like this.
Download the image
You will need to download the latest version of the Raspbian OS, which we will install on the SD card of your Raspberry Pi.
- Download Raspbian Buster with desktop and recommended software
- Download Raspbian Buster with desktop
- Download Raspbian Buster Lite
You will also need Win32DiskManager software, download it here and install it.
NOTE: that you will need to be able to write on the SD memory card, which involves either a computer with a compatible port, or an external SD card reader who can be buy here.
Install the image
- Insert the SD card into your SD card reader. You can use the SD card slot if you have one, or an SD adapter in a USB port.
- Run the Win32DiskImager utility.
- Select the image file you extracted earlier.
- In the device box, select the drive letter of the SD card. Be careful to select the correct drive: if you choose the wrong drive you could destroy the data on your computer's hard disk! If you are using an SD card slot in your computer, and can't see the drive in the Win32DiskImager window, try using an external SD adapter.
- Click 'Write' and wait for the write to complete.
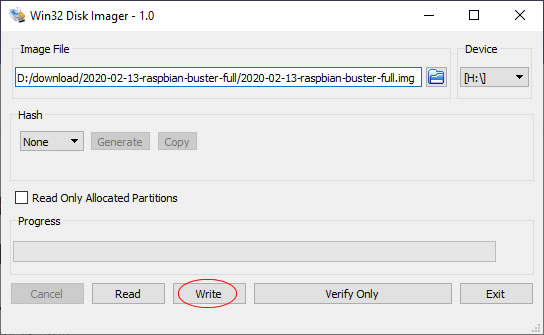
- Exit the imager and eject the SD card.
Enjoy!